Technical Note:
Lens Fundamentals

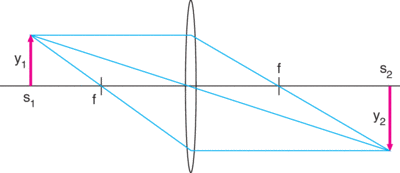
FIGURE1R-S
Figure 1

By ideal thin lens, we mean a lens whose thickness is sufficiently small that it does not contribute to its focal length. In this case, the change in the path of a beam going through the lens can be considered to be instantaneous at the center of the lens, as shown in the figure. In the applications described here, we will assume that we are working with ideally thin lenses. This should be sufficient for an introductory discussion. Consideration of aberrations and thick-lens effects will not be included here.

Three rays are shown in Figure 1. Any two of these three rays fully determine the size and position of the image. One ray emanates from the object parallel to the optical axis of the lens. The lens refracts this beam through the optical axis at a distance f on the far side of the lens. A second ray passes through the optical axis at a distance f in front of the lens. This ray is then refracted into a path parallel to the optical axis on the far side of the lens. The third ray passes through the center of the lens. Since the surfaces of the lens are normal to the optical axis and the lens is very thin, the deflection of this ray is negligible as it passes through the lens.

In addition to the assumption of an ideally thin lens, we also work in the paraxial approximation. That is, angles are small and we can substitute θ in place of sin θ.

Magnification

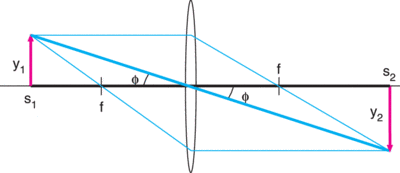
We can use basic geometry to look at the magnification of a lens. In Figure 2, we have the same ray tracing figure with some particular line segments highlighted. The ray through the center of the lens and the optical axis intersect at an angle φ. Recall that the opposite angles of two intersecting lines are equal. Therefore, we have two similar triangles. Taking the ratios of the sides, we have

φ= y1/s1 = y2/s2

This can then be rearranged to give

y2/y1 = s2/s1 = M.

The quantity M is the magnification of the object by the lens. The magnification is the ratio of the image size to the object size, and it is also the ratio of the image distance to the object distance.

FIGURE2R-S
Figure 2

This puts a fundamental limitation on the geometry of an optics system. If an optical system of a given size is to produce a particular magnification, then there is only one lens position that will satisfy that requirement. On the other hand, a big advantage is that one does not need to make a direct measurement of the object and image sizes to know the magnification; it is determined by the geometry of the imaging system itself.

Gaussian Lens Equation

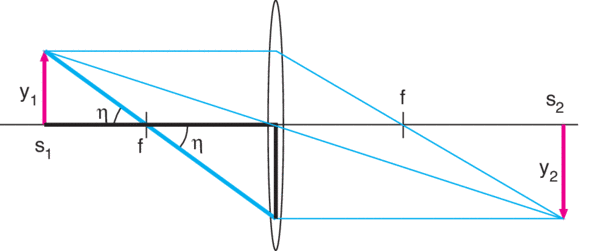
Let’s now go back to our ray tracing diagram and look at one more set of line segments. In Figure 3, we look at the optical axis and the ray through the front focus. Again looking at similar triangles sharing a common vertex and, now, angle η, we have

y2/f = y1/(s1-f).

Rearranging and using our definition of magnification, we find

y2/y1 = s2/s1 = f/(s1-f).

Rearranging one more time, we finally arrive at

1/f = 1/s1 + 1/s2.

This is the Gaussian lens equation. This equation provides the fundamental relation between the focal length of the lens and the size of the optical system. A specification of the required magnification and the Gaussian lens equation form a system of two equations with three unknowns: f, s1, and s2. The addition of one final condition will fix these three variables in an application.

This additional condition is often the focal length of the lens, f, or the size of the object to image distance, in which case the sum of s1 + s2 is given by the size constraint of the system. In either case, all three variables are then fully determined.

FIGURE3R-S
Figure 3

Optical Invariant

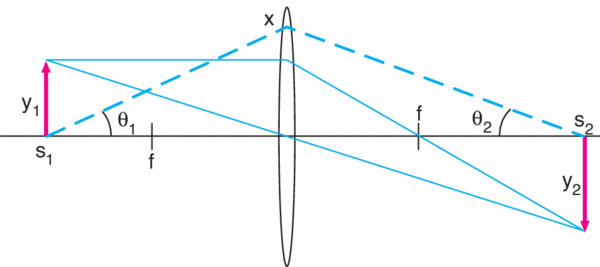
Now we are ready to look at what happens to an arbitrary ray that passes through the optical system. Figure 4 shows such a ray. In this figure, we have chosen the maximal ray, that is, the ray that makes the maximal angle with the optical axis as it leaves the object, passing through the lens at its maximum clear aperture. This choice makes it easier, of course, to visualize what is happening in the system, but this maximal ray is also the one that is of most importance in designing an application. While the figure is drawn in this fashion, the choice is completely arbitrary and the development shown here is true regardless of which ray is actually chosen.

FIGURE4R-S
Figure 4

This arbitrary ray goes through the lens at a distance x from the optical axis. If we again apply some basic geometry, we have, using our definition of the magnification

θ1 = x/s1 and θ2 = x/s2 = (x/s1)(y1/y2).

Rearranging, we arrive at

y2θ2 = y1θ1.

This is a fundamental law of optics. In any optical system comprising only lenses, the product of the image size and ray angle is a constant, or invariant, of the system. This is known as the optical invariant. The result is valid for any number of lenses, as could be verified by tracing the ray through a series of lenses. In some optics textbooks, this is also called the Lagrange Invariant or the Smith-Helmholz Invariant.

This is valid in the paraxial approximation in which we have been working. Also, this development assumes perfect, aberration-free lenses. The addition of aberrations to our consideration would mean the replacement of the equal sign by a greater-than-or-equal sign in the statement of the invariant. That is, aberrations could increase the product but nothing can make it decrease.